Wednesday, August 17, 2016

Remarkable images of.....Nothing!

And one exception. I think I'll start with the exception. And in it's own way, it's remarkable, too.
Saturn


Obviously, this is Saturn. The black “space” in the rings is called the Cassini Division, usually a test of seeing and telescopes, focus, etc. When this image was taken, Saturn was just starting to go over the metal roof of the observatory, which means that the seeing was going to be terrible. You've looked over the hood of a car on a hot summer day and seen the optical distortion there, what I called, as a kid, “heat waves”. The heat rising from the hood of the car causes a change in air density, which changes the refractive index of the air, which causes the visible distortion. Same thing happening here. As mentioned before, I image the moon and planets with a video camera, which produces .avi files. The video file of Saturn looks terrible. One frame from the .avi file looks like this:


Fuzzy Saturn

I had a lot of trouble just trying to focus the scope. Wasn't sure it was focused! Anyway, I recorded the file. Next day, I ran it through a program (app to you youngsters) called AutoStakkert, which is a program that examines the .avi file frame by frame, picks out the image, and then tries to stack the good frames on top of each other to make a clear image. In this case, I am amazed. This image is remarkable simply because of how clear it is, considering what it started with.

The remaining images are remarkable because of what is not there. This explanation is mostly for the imagers out there (assuming any are reading this, which is a big assumption!). These images were taken with the same scope, just optically “rearranged” to image at F6.3 (normal is F10). (For you non-imagers out there, what that means is that the focal length of the scope is normally 10x the aperture. My scope is an 8 inch scope; that is, the mirror is 8 inches in diameter. That is it's aperture. That makes the focus 10x 8 or 80 inches from the mirror. My scope is a type of reflector known as a Schmidt-Cassegrain Telescope or SCT. The SCT optical design “folds” the optical path back onto it's self so that light comes in the front and goes out the back. Most people think of a refractor when they think of light coming in the front and going out the back. If I'm running the scope at f6.3, the focus is 6.3x8 or 50.4 inches from the mirror. Visually, this makes no real difference. For imaging, it's a pretty big difference. For reasons I won't go into now, it's more desirable.) The test was for focus, and to be sure the field imaged was flat, meaning all of the image was in focus. With the moon up, I had little choice but to image star fields, so I chose several globular clusters. Also, since this was only a test, I chose to not cool the camera. This combination would cause 2 really bad problems: 1) light gradients from the moon and a (very) nearby street light, and 2) lots of thermal noise in the image. And, guess what? I got both! The thermal noise shows up as lots of gray or white dots (pixels, actually) in the image, and the light gradient looks like fog or a cloud over parts of the image, but not necessarily all of it. Notice also how the gray sky “hides” the dimmer stars. This is why astronomers look for and go to “dark sky” sites, where arrificial light won't cause this type of problem. The moon still will, though. Last but not least, these are 1 minute, guided images and only one image was taken. Usually, I would take at least 15 images, probably 3 minutes each.

M4 pretty much as it came from the camera


I processed the image in Nebulosity 4 like I always do. Not like I always do, however, I tried using an old dark frame to create a Bad Pixel Map (BPM) and also tried a new-to-Nebulosity 4 feature called Synthetic Flat Fielder. (The reason for creating a BPM was that I don't have a 1 minute dark at 28 degrees C available.)

Much to my pleasant surprise, the thermal noise is practically all gone, as is most of the light gradient. As alluded to before, these aren't really astounding images in and of themselves. But, considering the conditions under which they were taken, I, as does at least one other imager who has seen one of them, think they are remarkable; not for what's there, but for what's not there. Images identified by their Messier number.
IMAGES OF M4, 9, 19, 62, 80
M4, after processing

M80, after processing

M62, after processing
M19, after processing
 
M9, after processing

Tuesday, July 26, 2016

One day, Two Astronomy Sessions

Monday, well actually Sunday, I decided that mornings were substantially better for trying to see anything in the “night” sky. Maybe that would be better said, when the sun in below the horizon enough to make it seem like it's night. That would be because Monday morning started about 5 AM with the idea from Sunday to get up early, hopefully before the clouds returned, and see what could be seen in the sky. With the haze, VERY high humidity, and the possibility that my eyes weren't completely open, the only real target was the moon. Fortunately, that's what I had planned for on Sunday.

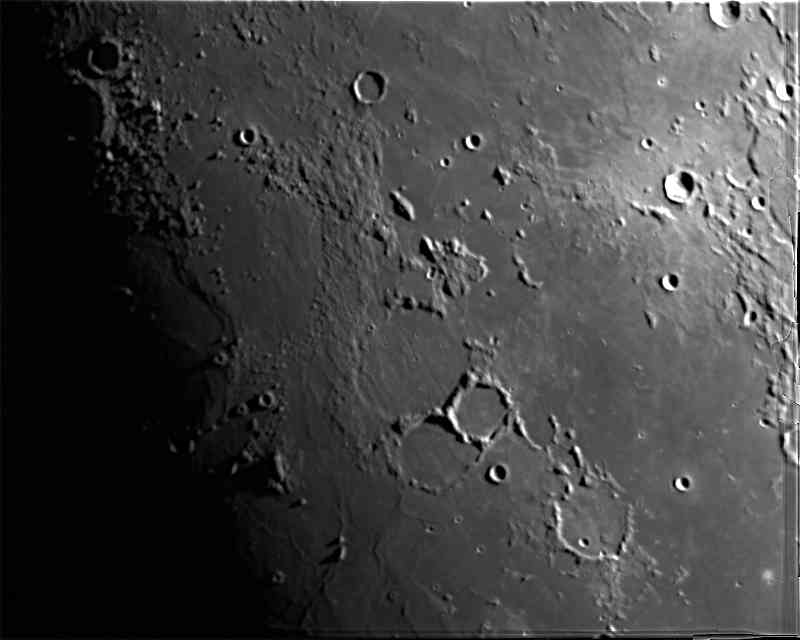
The list of lunar objects is being drawn from the Astronomical League's “Lunar List”. These images are from the list and were close to the terminator (division between day and night), which is where I like to photograph them. As with my carvings, a low angle of light makes the relief stand out better.

Manilius and Rima Hyginus


This image shows off two of the targets, as will the next image, in one photo. The prominent crater just above the center is target #1, Manilius. The thumbnail sketch is that it's about 24 miles in diameter, has a central mountain, and is about 9400 feet deep. I find it's interesting that to the right of the crater, the terrain is rough, while to the left, the terrain is very smooth. I wonder why? Target #2 is at the lower left. It's a valley with a small crater more or less in the center of the valley. It looks somewhat like a bird in flight, with a small body and very long, thin wings. This is Rima Hyginus. “Rima” translates to “groove” and it's believed that this groove was once a lava tube that has collapsed. Its about 133 miles long and about 2 miles wide. The crater in the center is Hyginus, and is a sight of Transient Lunar Phenomena (TLP), according to Virtual Moon Atlas. The Phenomena? “smokes according to Sacco.” What?? Well, Hyginus is a crater believed to be formed by a volcano, rather than an impact crater. The moon, as I understand it, is supposed to be volcanically Inactive, but, who knows? Five minutes of research on the net does show some references to TLP activity in this area of the moon! Who knew? I might image this one more often.


This is another two in one image, this time two crater groups in the southern part of the moon. The craters, marked as you can see are Maurolycus and Gemma Frisius. Maurolycus is about 69 miles in diameter and that apparently is big enough to have small craters on the floor of this crater. For me, one of the interesting things to see is that the shadow covering the floor of the crater is larger than some of the surrounding craters. That most likely indicates how deep the crater is relative to some of the surrounding craters. Gemma Frisius is about 53 miles in diameter. Other than that, I don't know much more about these two craters.

Mars F10

Mars F 30
Yep, that's Saturn


The other two targets for the day are rather obvious when you look at them. They are, of course, Mars and Saturn. I might keep track of Mars as often as I can, because it looks like there might be a storm a-brewing. I want to see if the dark area that looks like a funny looking “X” changes over time. Of course, that means the clouds have to part, so good luck with that, I guess. The reason for two images of Mars that look slightly different, is because I wanted to experiment with changing focal length of the scope and observing it's impact on the resulting image. One result was expected, one not. The expected result: the F30 images looks a little darker. Why? (Thank you for asking.) The same amount of light is spread out over a larger field of view (FOV). Same light, larger surface area = dimmer image. The unexpected result: just how similar in detail the images are. I was expecting a little more detail in the F30 image, but it's not there. That very likely is because the seeing (steadiness mostly, in this case) was poor. Think of taking a picture of a runner. If the shutter is open too long, you get a blurred picture. Basically, that's what is happening here.

Until next time. 

Sunday, July 17, 2016

Well, Here's an oddity

With all the cloudy weather, I decided to look at some other astronomer's blogs to see if I could glean some information on image processing. I think I hit the jackpot on Jerry Lodriguss's site Catching the Light. Specifically, this link http://www.astropix.com/HTML/J_DIGIT/VIGNET.HTM about uneven field illumination. Look back to an entry around April 10th 2016 at the images and problems with the galaxy M100. Here's the problem image.

M100. Notice the light area extending into the corners.
As you can see, the field (or basically the image) is not evenly dark. There looks to be a bright bulls eye or circle near the edges. By using the ideas in Jerry's article, I was able to remove most, but not all, of the offending bright circle.

Same image as above, but with a lot of the brightness near the corners removed.


Now I think you can see that most of it is gone. I think that looks better, don't you? It shows a little less of the galaxy, but I think the general improvement is worth it. Nevertheless, I still think the best of the bunch is the one that's the luminescence channel only.

Still the best of the bunch. Black and white only image.

Oh, and the oddity? I wrote an entry without taking ANY images! Just recycled an old one.

Saturday, July 16, 2016

Que the Apollo 13 music...

If you are as old as I am, you were around during the Apollo Moon Missions, which would be basically 1969 to about 1974 or so. I think. I can't remember exactly when the U.S gave up on going to the moon. A big mistake in my opinion. But that's not what this entry is about. The mission that was called the “successful failure” is, of course, Apollo 13. Intense to follow real time and a pretty good movie, staring Tom Hanks. That would be the music I'm referring to in my title. I think the original sound track is pretty good, too. I'm still off point, sorry. The point is that the landing area for Apollo was the crater Fra Mauro. It was not until Wednesday night, the 13th, that I was able to image it, or anything for quite some time. The past several months have been the cloudiest I can seen for a long time.
I didn't know Fra Mauro's location on the moon until a few days before the 13th. Earlier the spring, while it was cloudy, I decided I wanted images of the Astronomical League's Lunar List, which can be found on their web site. (You don't need a telescope for all the items, so you could download the list and see how many you could see.) I looked over the images of the moon I already have and found I already have about 60% of the list. One that I didn't, up until now, was Fra Mauro. And, to me, that's a rather important one. So, I basically got lucky on the evening of the 13th because Fra Mauro was near the terminator, which is an ideal placement for imaging and it was CLEAR. Well, clear enough. So, without further ado (or finally...what's taking so long as some would say).....

So, which crater IS Fra Mauro? Well, it's this one. With the white dot that is

Now that you know which one it is, this is the same image without the identification.

Thanks to Virtual Moon Atlas, this is where Fra Mauro is in relation to the whole moon.

My image is the best 95% of 1100 images taken on the 13th. Remember that I do lunar and planetary imaging with a webcam, so that represents only 34 seconds of time to take the 1100 images. In fact, I was able to open the observatory, turn everything on, get everything aligned, take the images, visually observe Alberio (probably my favorite double star) and epsilon Lyre (the famous “double double”. Naked eye, it appears as one star; in binoculars or telescope at low power, it appears as a double star; on high power, the each star of the double star resolves into a double star; hence the double double. If a planet could fit somewhere in there, it could have 4 suns. Probably wouldn't get much sleep....). Then turn everything off, put everything up, and close the observatory, all within an hour. That's pretty fast for me.
Well, that's about it for this time. Should the skies part again for an hour or so, I hope to get another Mars and Saturn.... I've got an idea for something a little different I want to try next time.

PS, Just as an aside, my image happens to show one of the many challenges of imaging, dynamic range. Dynamic range here refers to the difference, in the image, between the lightest and darkest areas. The crater in the upper right of the image is completely white while the left side of the image is completely black.  Computers assign a value of of 0 (zero) to black and 255 to white on most displays (which are 8 bit). When the limits of 0 or 255 are reached, in the image, information is lost. There is no way to discover if there is more information, or image, in either the black or white regions. The "trick" in most imaging is to not reach either limit, 0 or 255, in an image. Sometimes, it just isn't your day... :)

Tuesday, April 19, 2016

A little closer to Home

Well, the moon is getting fuller by the day,which sheds so much light on these humid skies that most of the deep sky stuff is basically invisible. So what's an astronomer to do, you ask? (Thank you for asking.) We look at the brighter objects. Mostly, that's solar system objects. I was hoping to get an image of Jupiter, but it turned out so poorly that I decided it was better to recycle the memory locations in the computer. It was BAD.

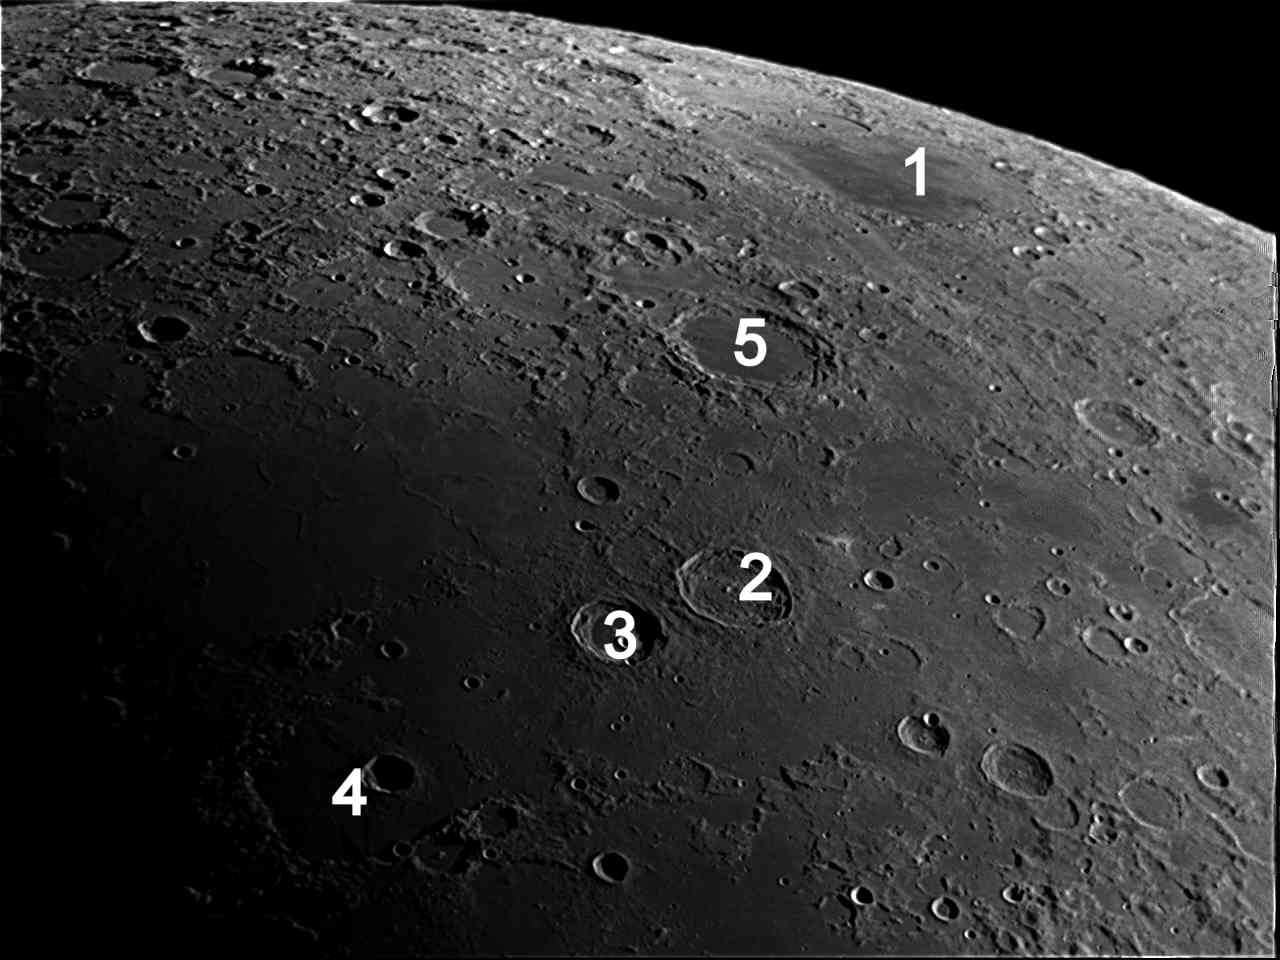
The moon was a different story, however. I imaged three areas on the 12th, which meant I imaged with the terminator more easterly than I usually do; I usually start imaging around 1st quarter. The reason is that the moon is over the roof of the observatory, which causes that already unsteady air to be even more so. This time, however, I got lucky; the air wasn't much worse than normal, so I gave it a try. What you see below is image (processed, in PIPP and Registax 6 if any astronomers are reading), and the same image which has been annotated to show some interesting areas. Information presented was from Virtual Moon Atlas, which I highly recommend.


The numbers are a few of the more interesting areas and are as follows:
  1. Mare Humboldtianum. Situated in the zone of librations. (The oversimplified explanation of librations is that the moon, while presenting the same “face” to us all the time, will “rock”, back and forth a little from time to time. When the moon rocks one way (like a rocking chair type rock), we can see a little more of whats on one of the edges. That extra area we can see is the zone of librations. In this case, the moon has rocked a little westerly, so more of the eastern edge is visible than “normal”. ) The sea (Mare) is about 97 miles by 97 miles in area. It is named after Alexander von Humboldt, a 19th century German naturalist and explorer.
  2. Crater Atlas. It's about 53 miles in diameter and about 9100 feet deep. Yes, it's that Atlas, with the weight of the world on his shoulders.
  3. Crater Hercules. About 42 miles in diameter and 9700 feet deep. The smaller crater inside Hercules is called Hercules G, the smaller still crater on the southern (actually south west ) rim is Hercules E. “G” is about 8 miles in diameter and about 4100 feet deep, while “E” is about 5 miles in diameter. I don't have a depth (or actually height of the walls) for “E”.
  4. This is a “twofer”. The crater is in the middle of a lake. The crater is Burg, which is about 24 miles in diameter and about 6700 feet deep. The lake is Lacus Mortis, the Sea of Death (sounds like a good entry for October 31st). It's about 91 miles by 91 miles. It's also too deep in shadow to see much else.
  5. This crater was so prominent I thought you might just want to know about it. It's called Endymion and it's about 76 miles in diameter, about 13900 feet deep. Apparently, Endymion was a Greek mythological shepherd who bewitched Selene. Who knew?

The last two are hopefully easily recognizable. Saturn I'm sure you will recognize. The lower one is Mars. Both are in the early morning sky, in the constellation of Scorpio.

Thursday, April 14, 2016

Failures, Successes, and the Learning Curve


It's been a while since the last post, but I haven't stopped imaging the night sky. As the title suggests, some have been more successful than others, but I have learned some along the way. So, let's start with one of the more successful images, then continue chronologically.

February 27, 2016
NGC2261 HUBBLES VARIABLE

This image, of the cone looking thing, is know as NGC 2261, AKA Hubble's Variable Nebula in the constellation of Monoceros (Unicorn). Don't know where that one is, you say? Well, it's near the brightest star in the sky Sirius... which is also near one of the two most recognizable constellations in the sky, Orion. It's a dim constellation, quite hard to spot, actually. Anyway, the cause of the variability appears to be somewhat uncertain, but possibly caused by dust drifting between the illuminating star (R Mon, which is itself not directly visible) and the nebula. If it is an illuminated nebula, that means it's a reflecting nebula, meaning it's reflecting the light from the star. In other words, it's not glowing (which would be an emission nebula). It's about 2500 ly away and shines about magnitude 9. The variability can be as much a 2 magnitudes.
One thing I didn't know in March, is that I was going down a path of imaging dimmer and dimmer objects, generally speaking, and the problems I was getting myself in for. Hence, the failures and learning curve that eventually follows.

February 29, 2016
M79
I think this one is a successful image as well. It's M79, in the constellation of Lepus (Rabbit), which is just “under” (south) of Orion. It's a globular cluster of stars. The interesting story of M79 is that it is probably an “extra galactic” globular cluster. In other words, it was not formed in our galaxy, the Milk Way. Although there is debate about this, it appears it was formed in the “Canis Major Dwarf Galaxy”, which is currently being absorbed into the Milky Way. (“Resistance is futile”.... sorry Star Trek fans.) Anyway, it's about 41,000 light years away from us and is considered about 11.7 billion years old, which is younger than most of the globular clusters.

Also February 29, 2016
M105

This is where things start to go downhill, as it were. After weeks of working on the situation,I think I have finally figured out a reasonable explanation: the problem is, I think, that the brightness of the objects I'm imaging is so close to the brightness of the sky glow (background light pollution) that normal image processing gets “confused” and adds noise back into the image, making it almost impossible to extract the image of the object I wanted to begin with. It's rather like taking a picture of a polar bear in a snow storm and then trying to get a clear image of the bear. M105 doesn't look like the “typical” image of a galaxy. That's because it's an elliptical galaxy. There are lots of these in the sky. M105 has a brightness of magnitude 10.2, and a surface brightness of 11.3. In the case of magnitudes, the higher the number, the dimmer the object. It turns out that, with the skies I have at the Starlight Observatory, a surface brightness of 11.3 is getting mighty close to the limit of my equipment. That's my excuse, anyway. So, what's the other fuzzy stuff in this image. There is something that looks rather like the galaxy to the upper left of M105. It turns out that this is a galaxy (NGC3384) that happens to contain the quasar 1045+128. NGC3384 is just a little further from us that M105, 38 million ly for 3384 vs. 32 million ly for M105. The third, dimmer, galaxy, to the lower left of M105 is NGC3389. While M105 and NGC3384 are part of the “local” Leo I group, NGC3384 is not. It's about twice as far away.

March 4, 2016
M96
This is one I consider mostly successful. This is M96, a galaxy that's about the same distance from us as M105 and about the same brightness. As you can see, it has a little more of a spiral structure. It's located a little south of M105 in the sky. Whereas M105 is part of the Leo I group, M96 is part of another group called, not to anyone's surprise, the M96 group of galaxies.


March 7, 2016
M109
This is one more on the failure side. The noise (graininess) is apparent and impossible to remove. This galaxy is only a little dimmer than the ones above. Perhaps there was some high cloudiness that I couldn't see? I don't know. I may try this one again at a later time just to see if I can improve on this one. At any rate, this is M109, found around the bowl of the Big Dipper. M109 is a barred spiral galaxy that's about 60 million light years away. By “barred”, that means there is a ”bar” of stars that causes the galaxy to look somewhat like the Greek letter theta ,θ. There are also two more galaxies in this image, but they are difficult to see. They are UGC (for Uppsala General Catalogue of Galaxies) 6940, which is a tiny fuzzy spot just south of M109, and UGC6969 to the left of M109. For a little more information on UGC, see

April 3, 2016
M41
M41 is a large open cluster in Canis Major. The cluster is just south (below) the star Sirius. It's bright at magnitude 4.5, and is about 2300 ly away. I covers an area of about the same size as the full moon, about ½ degree. I consider this one a success as well.

April 3, 4, 5, 2016

Finally, the challenge that caused me to decide I didn't have enough “signal”. That means that the object was just too close to the sky glow. After working for days trying different processing ideas, I finally decided to look at the underlying raw images. What I found was that the object was only just barely perceptible. The data couldn't be stretched enough to bring the object forward from the background. It would be pointless to show a raw image, but I can and will show what the image looks like when it's just too dim to be separated from the background. It looks like this.
M100 Noise apparent especially in corners (vignetting)
The image is of M100, a galaxy in Coma Berenices, which is just east (left) of the constellation of Leo the Lion. It's about as bright as some of the other galaxies shown above, but the difference is I used 1 minute exposures (a total of 40 minutes worth) vs. 3 minute exposures for most of the other galaxies. Looks really bad. However, one night I shot 13 3 minute shots. It's the luminescence channel only, but you can see the obvious difference. You can even see 5 more galaxies in this image.
M100 3 minutes exposures, in black and white
IMAGE OF 3 MIN 100
Well, kids, that's it for now. I need to try some scope modifications to help with the auto guiding, but hopefully I'll get more images soon. A lot depends on the weather, which has been really bad (for astronomy) for the last year.

Saturday, February 20, 2016

Fun with color, among other things

A few nights ago, before this latest string of rainy, cloudy nights, I went to the observatory to just have some fun. Since it was just past 1st quarter moon, the sky was bright enough that only a few objects, other than the moon, was visible. My actual goal was to work on a problem with auto guiding. I found by reading the LX200GPS Yahoo group that one of my guiding problems was a setting on the telescope, specifically the anti backlash setting being too high. I would never have thought it would have been the problem, but it was. Before resetting the value, from 92% as shown to be a good value in PemPro, the scope would go into an unstable oscillation when trying to guide. By changing the value to 2%, problem solved. Thanks, Dr. Clay. It took all of about 10 minutes to make and verify the correction. I had allowed myself about an hour to work on the problem, which is usual for me, so I had some time play. What follows is the result of that playing.
Since the moon was just past 1st quarter, I decided to do what I call “running the terminator”. The terminator is the dividing line between day and night. The moonscape is most interesting on or very near the terminator, so I will just look all the way up or down the terminator at the sites. This time, I took images. To have a little fun with the processing, I greatly increased the saturation of the colors to see if I could tease some of the limited amount of color from the images. So, presented here is “the terminator” with color enhancements (over enhancements, actually). The bottom 2 images didn't get much change with enhancements, so they didn't get any changes. So, even though all the images are in color, only the top few have the saturation turned up. Top image is the “top”, or north, pole of the moon. Others are in order going south.


As mentioned in a previous post, the “moon camera” is pretty much just a modified web cam. In general, it's nor suitable for deep sky imaging, ie, imaging galaxies and nebulae. Just for fun, I decided to point it at M42, the Great Orion Nebula in the sword of Orion, just to see what I would get. It was able to get some of the nebula, as well as the Trapezium, the 4 stars illuminating the nebula. You can see the 4 stars with the nebula around them. Not the best image, no surprise, but interesting none the less.


Finally, also at the same time, and while the “big” camera was still attached, I decided to check the tracking by imaging M81, which is a galaxy relatively close to the North Star. I used only the red, green, and blue filters (not the luminescence filter), but exposed for only a minute, literally. One minute red, one green, one blue, and 3 one minute exposures with no filter. The tracking turned out pretty good. But, as expected, the images are very noisy and the galaxy quite dim. So I tried a different approach to the processing. After the normal processing in Nebulosity, I tried playing with layers and masks in GIMP. I was able to tease more signal out this way, but it also brings with it more noise. Even with the extra noise, it made a great improvement in the galaxy.